Thursday, September 15, 2016

DIY: Scrunchie Mesh Deco Wreath

Make a beautiful scrunchie deco mesh wreath to hang on your door or anywhere in your home! Use the colors you'd like and simply follow these easy steps! I forgot to take pictures at each new step but I will write what I did.

The supplies you'll need. I get all my supplies at Hobby Lobby. All these supplies together costed me around $20.00.

  • Two colors of 10" mesh rolls. 
  • One roll of a wide ribbon. Ribbon that has wired edges seems to work better.
  • One 20" wreath wire frame. (this wreath was a bit bigger then I expected, so next time I'll probably use the wreath frame that I believe is 16".
  • One package of pipe cleaners. Pick a color that will sort-of blind in with the colors you picked.
Begin by adding the pipe cleaners to the wreath frame. Starting on the outer edge of the frame, tightly twist the pipe cleaner around the two outside rings of the frame. Attach one pipe cleaner at each of the cross wires on the frame. When you have done this, move to the inside and twist a pipe cleaner around the two inside rings. This time, attach the pipe cleaner between the cross wires of the frame.


When you have added pipe cleaners around the inside and outside rings of the wire frame, you should have a total of 20 (if your using a smaller frame then less)  pipe cleaners attached.


The next step is to gather your mesh. Roll about 10'' of each color out. Secure the gathered ends of mesh to the inside rings of the frame by twisting the pipe cleaners tightly around the end. *Remember to always twist in the same direction to avoid untwisting the pipe cleaner underneath.


Now that you have started, the next steps are easy. Following the circle, attach the mesh to each of the pipe cleaners around the inside rings. Allow approximately 10'' of the mesh between each pipe cleaner. Here is what mine looked liked half way around the inside rings. 


Once you have completed the inside, start on outside. You can choose to cut your mesh and start with new ends or just keep going like I did. Also I go around the inside once but when I go to the outside I go around it twice just to make it more full. You can choose the fullness you like, if you choose even more fuller then what I have you will need another roll of mesh. 

Once you finished the inside and outside and it is the fullness you want, add your ribbon the same way you added the mesh. I added my ribbon on the inside and outside, but I've seen some wreath that just have the ribbon on either one. 

When your done with that, make sure your pipe cleaners are twisted really tight and cut off the remaining part of the pipe cleaner. I usually bend mine so its not pokey. 

You can choose to add accessories. I added two medal letters to make "OU" for football season. Here is what mine looked liked when it was done! 


Sunday, September 4, 2016

Wrestling medal frame


This is a really easy and fun project to keep all your medals!
You'll only need a few supplies!

  • Medals 
  • Black shadow box frame. (Size depends on how many medals you have)
  • Hot glue
  • Colored paper or background (optional)
Arange the medals on the background paper and hot glue them down the way you like. Put the rest of the ribbon behind the paper and glue those down. Place the paper in the frame and your done!

Saturday, September 3, 2016

Curly deco mesh wreaths.


Here are a few more of the curly deco wreaths I made. To learn how to make these go check out my first blog post called "DIY: curly deco mesh wreath" 


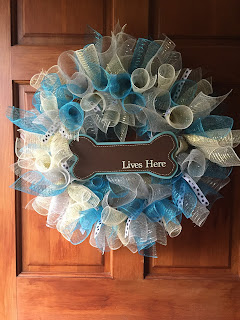
In this wreath I used turquoise, silver, and gold for the three mesh colors. For the ribbon I used a thin black and white dog paw print pattern ribbon. I also bought the dog bone chalk board at Hobby Lobby.


In this wreath I used black, gold, and brown for the three mesh colors. For the ribbon I used a thick cheetah print ribbon.

DIY : Curly Deco Mesh Wreath

These deco mesh wreaths have a fun and have a festive look to them! I chose these colors because it went with the house it was going to. You can choose whatever colors you like to make it fit your home or for any holiday!


Here is a picture of the supplies you'll need. I get all the supplies at Hobby Lobby. Usually For all this it costs around $20-$25. The mesh rolls will also last for two wreaths.

  • One 16'' wire wreath form 
  • Three different color 10''rolls of mesh (you can use more if you want a fuller/bigger wreath).
  • One roll of ribbon. You can use a thicker one or smaller one, which ever you like better. 
  • Pipe cleaners. 
First to cut the spirals, cut pieces of each color of mesh about 9'' (doesn't have to be exact). Tightly roll one piece of mesh and keep it pinched in the center.


Roll the other two colors the same way and put them all together keeping them pinched in the middle. Next cut a piece of ribbon about 6''-8'' and put that on top of your mesh. Use a pipe cleaner to secure the centers together. Twist it as tightly as possible to keep the centers rolled and secured together.


Here is what the spiral set will look like held together with the pipe cleaner. I usually make about 10 sets of these then start attaching them to the wire wreath. I use the ribbon on every other one (if you think you want more ribbon then add it to each one, you'll have to buy two rolls of ribbon.) 


Place the spiral set on top of the wire wreath. Secure the spiral set onto one of the wires with the pipe cleaner and twist it tightly .Take the left over pipe cleaner that are now on the backside of the wreath form and twist them along other wires on the form. You are trying to keep the spiral set from moving along the wreath wires. Twisting the pipe cleaner along the parallel wires tightly seemed to work best for me. 
Now just continue to do this all the way around the wire wreath. 


 Here is the wreath about half way around 


Here is what the front and back will look like when it is all the way done. 

Here is how mine turned out on the door. I decided to add an "S" to it to make it more personal. 
Try this same technique with colors that will fit you!